The Ultimate Grammarly Review: Best Grammar Checker
I don’t know about you, but I’ve seen dozens of listicles about proofreading tools that include Grammarly.
That’s no accident.
Grammarly is universally recognized as one of the best tools out there for spelling, grammar, and readability checking.
In this Grammarly review, I’ll help you determine if it’s the right tool for you. We’ll take a look at its features, interface, pricing, and a few competitors to make sure it’s the right choice.
Let’s get this show on the road.
The Ulimate Grammarly Review and Tutorial
- 1. What is Grammarly and Why Use It?
- 2. Grammarly Free vs Grammarly Premium
- 3. How to Use Grammarly for Flawless Writing
- 3.1 The different ways to use Grammarly
- 3.2 Exploring the Grammarly Editor
- 3.3 Setting Grammarly Goals
- 3.4 Dealing with Grammarly alerts
- 3.5 Checking your article for plagiarism
- 3.6 Sending your article to a human proofreader
- 4. Verdict
- 5. Conclusion
What is Grammarly and Why Use It?
It doesn’t matter if you’re a student, teacher, blogger, or freelancer.
You need impeccable writing skills if you want to excel and succeed in your endeavors.
The only problem is, even the most skilled writers out there make mistakes. If you’re working on a 2,000-word article, you will overlook a few spelling, readability, and grammar issues you must fix.
This is where a grammar checker tool like Grammarly steps in.
Interested?
You should be because Grammarly’s proofreading features are available for free.
Experience Grammarly for Free.
Grammarly Free vs. Grammarly Premium
Before we look at Grammarly’s features, let’s deal with the elephant in the room.
A lot of you are probably wondering if Grammarly can be used for free.
That’s completely understandable.
Unless you have bottomless pockets, you need to make every dollar count. You can’t afford to splurge on every premium writing tool you come across.
The good news is, Grammarly comes with a free option with all the core features you need to polish articles. It checks for issues in your spelling, grammar, and punctuations — topped off with corrections you can apply with one click.
You can also use Grammarly’s free option for as many times as you want. This allows you to use the tool for yourself and decide if you wish to get the premium version.

By the way, here are the premium features you’ll miss out on if you stick with the free version:
- Readability checks for content that flows smoothly
- Vocabulary enhancement
- Built-in plagiarism checker for originality
- Writing style checker for specific genres
- More advanced structure, punctuation, grammar, and context checks
How much is Grammarly Premium?
Despite being a top-tier proofreading tool, Grammarly is actually on the affordable side.
For a single month, you can purchase a Grammarly subscription for $29.95. That’s well within reach of professional writers, bloggers, businesses, and some students.
You can reduce your monthly Grammarly cost down to $11.66 per month with an annual subscription. This may lead to a higher upfront cost, but you’ll end up saving a lot of money down the road.

Experience Grammarly Premium with a 40% Discount
So…is Grammarly premium worth it?
As a blogger, freelancer, or anyone who writes for a living, the short answer is yes.
But if we’re talking about Grammarly for students and hobby bloggers, I’d say try the free version first.
In case you didn’t know, I’ve already covered the basic features of Grammarly in my previous posts. A recent one would be my guide on the top four proofreading tools for bloggers, academics, and professional writers.
That said, I wanted to make this post a more comprehensive Grammarly Premium review.
With that out of the way, let’s dig into Grammarly’s paid features.
How to Use Grammarly for Flawless Writing
To show you how Grammarly Premium works, we need to talk about the many ways to use it.
1. The different ways to use Grammarly
Like some of the best proofreading tools in the market, Grammarly can be used across multiple apps.
It can be:
- Launched straight from their website
- Integrated as a browser extension
- Downloaded as a desktop app
- Installed as an add-on to Microsoft Office
- Used as a smartphone keyboard app
Grammarly web interface
If you’ve read the post I’ve linked above, you should be already familiar with Grammarly’s web-based interface.
This can be accessed by logging into your account on Grammarly’s website.
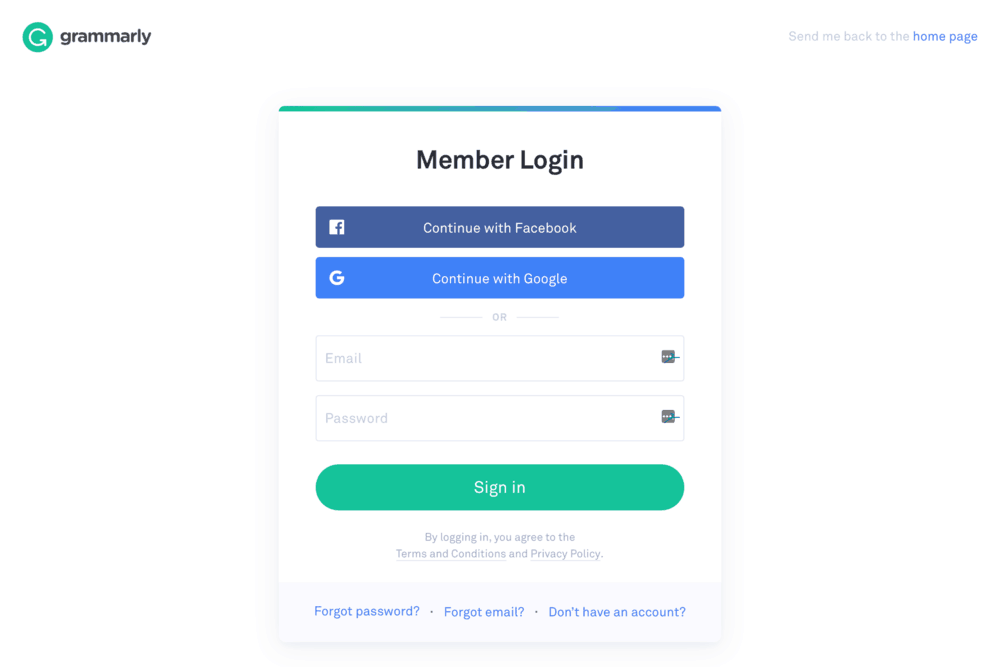
Once you’re in, you’ll be directed to your “My Grammarly” page where you can manage your proofreading tasks.
After upgrading your Grammarly account, your main dashboard should be decorated with the “Premium” ribbon.
That indicates that you’re ready to do some serious proofreading work.
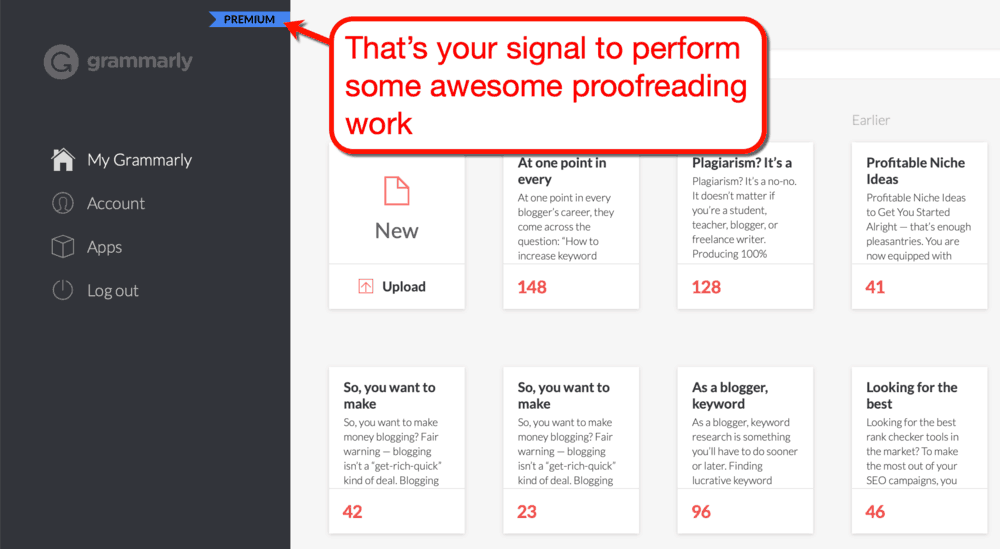
To check a new article, click the ‘Upload’ button or the “New” label on the first card.

If you chose to upload, simply locate the article on your computer. Otherwise, you will be taken to the Grammarly Editor with a blank document.
In which case, you may choose to write from scratch with the Grammarly Editor. Alternatively, you can simply copy and paste your article to get the ball rolling.

Using the Grammarly web interface is excellent for articles you’ve written and saved on your computer. Of course, you can also use the fully-equipped web editor as your primary word processor.
Either way, Grammarly will help you craft clear and grammatically-sound articles.
If, however, you do most of your writing on an email service or Google Docs, there is a more convenient option.
Grammarly browser extension
The Grammarly browser extension allows you to check everything you type in your web browser.
It could be on Facebook, Gmail, WordPress, or your email marketing platform.
For the sake of this guide, let’s say you use Google Chrome as your main web browser.
You can install the browser extension from the Chrome Web Store. The first step is to head to the Grammarly extension page and click ‘Add to Chrome.’

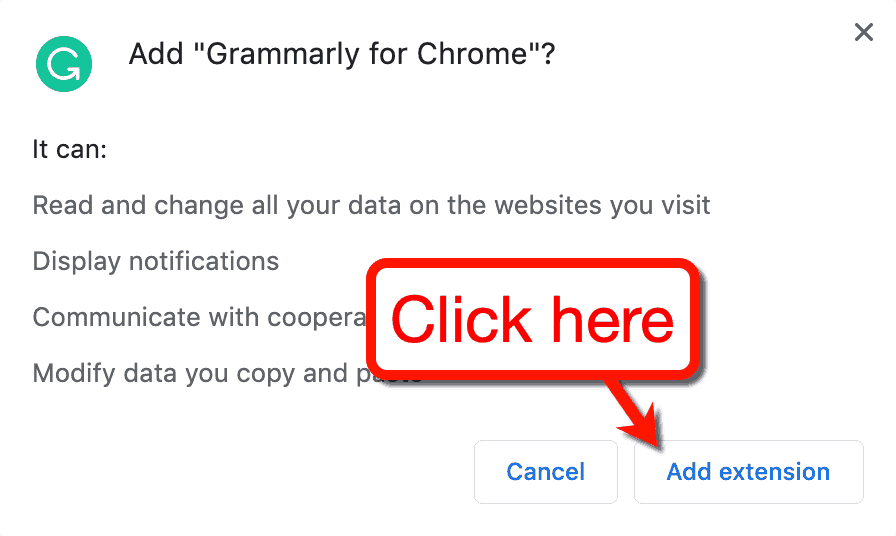
A pop-up should appear explaining the access privileges of Grammarly. If you accept them, click ‘Add extension’ to proceed with the installation.
You’ll know the installation is successful once you reach the “Welcome to Grammarly” page. The Grammarly extension button should also be visible in the Chrome menu.

That’s it — you can now go about your business while Grammarly works in the background.
All you have to do is look for the Grammarly logo at the bottom-right corner of the text field. For example, here’s the Grammarly logo on Quora’s “Add Question” window.

Clicking on the logo will pull up a mini-window of Grammarly’s web editor. That’s where you can complete your proofreading activities without leaving the page you were working on.
Grammarly desktop application
You want something even handier than a web browser extension?
How about a downloadable Grammarly app you can launch straight from your desktop?
You can download the appropriate Grammarly app for your operating system from their website.

And just like that, you can now launch Grammarly right after booting up your computer.
Other than the convenience factor of the Grammarly desktop app, it doesn’t really bring anything new to the table. After installation, you’ll have the same dashboard and all the features you can find in the web-based tool.
Still, the desktop app should be more efficient, especially if you work on a laptop. Web browsers are, after all, significantly more power-hungry than a lightweight, standalone application.
Grammarly for MS Office
Speaking of lightweight, Windows users can utilize the Grammarly integration for MS Office.
This will bring the proofreading features of Grammarly to Microsoft Wordand Outlook.
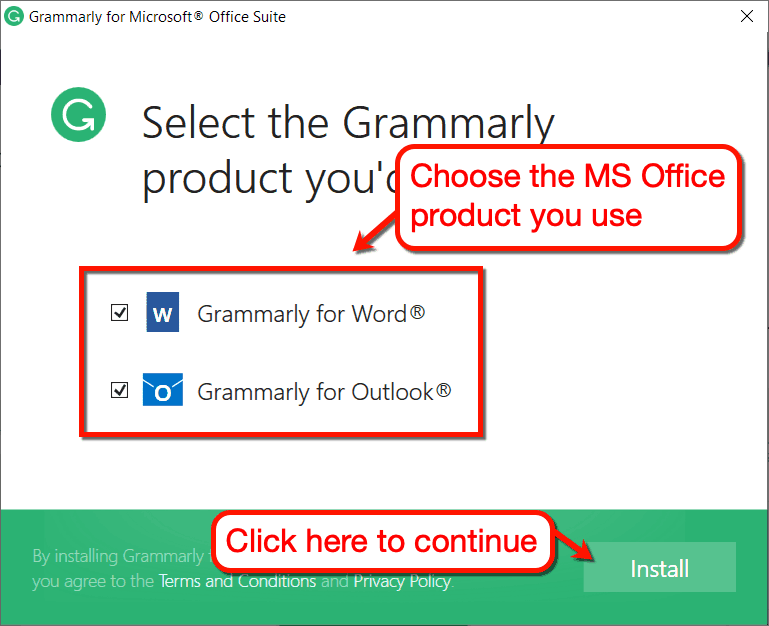
To install the integration, download the setup application from Grammarly’s MS Office Add-In page. When done, launch the executable file and follow the on-screen instructions.
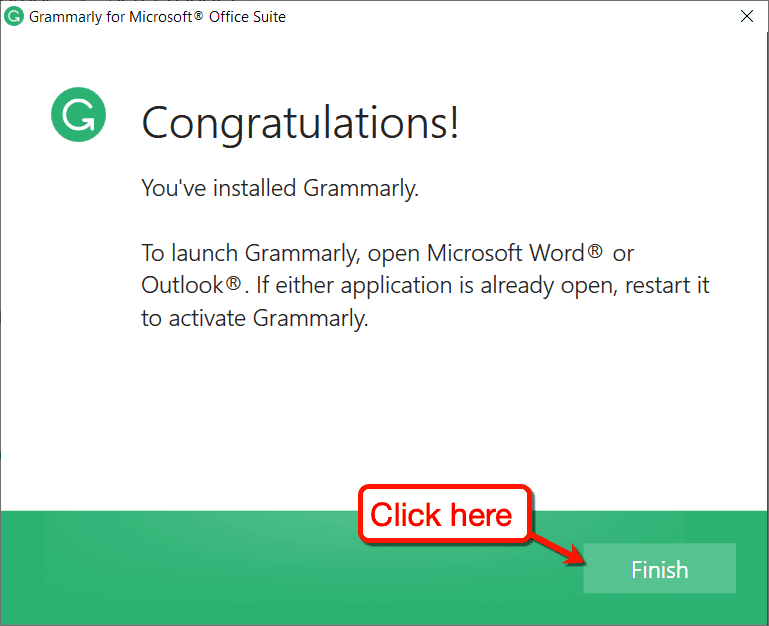
The first step is to choose the MS Office products you want to integrate with Grammarly. Simply select the programs you want and click ‘Install’ to proceed.
After the installation, click ‘Finish’ to close the setup application.
You should now be able to activate Grammarly from the MS Office product’s toolbar.
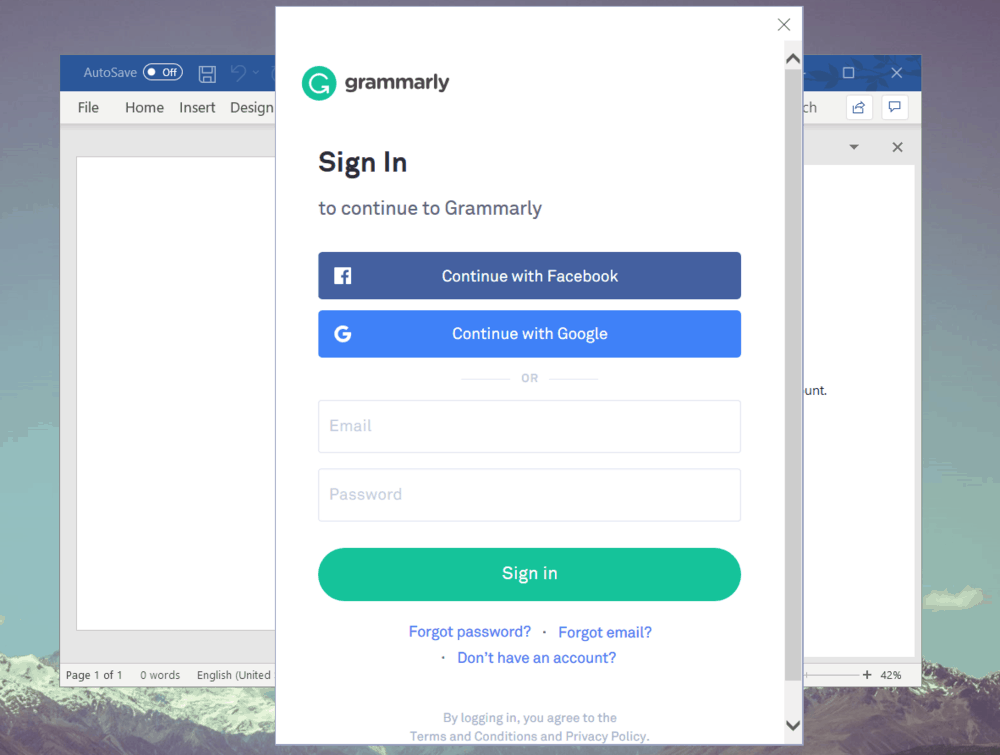
For example, on MS Word, you can click on ‘Open Grammarly’ from the “Home” toolbar or the “Grammarly” menu.

This will open up the sign-in window where you can fill in your Grammarly credentials.
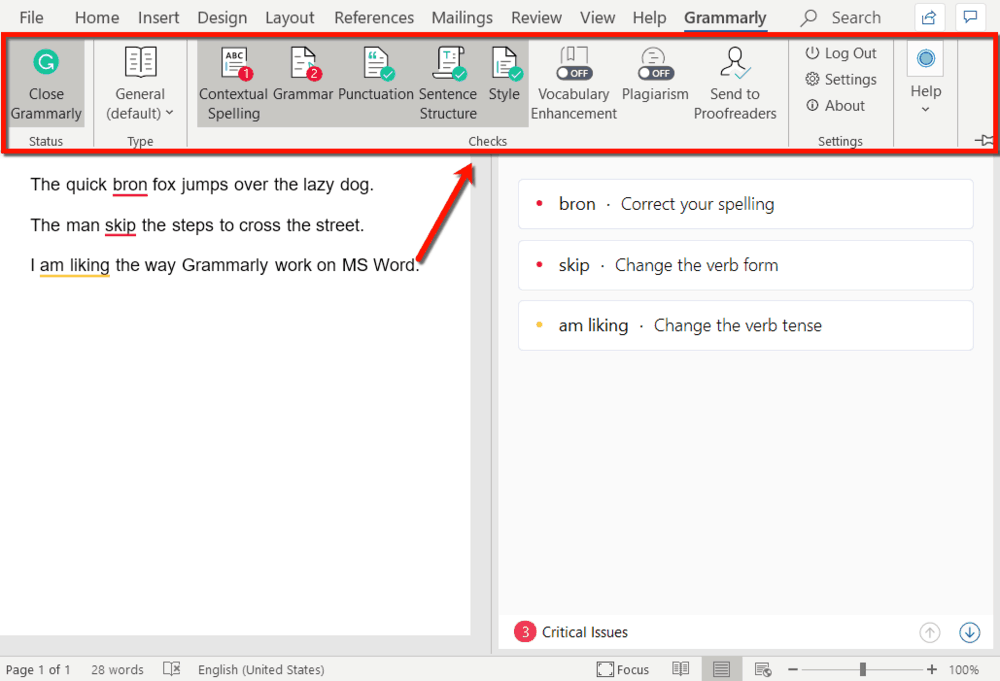
The Grammarly tab should now be visible on the right-hand side of the screen. All of the detected issues, along with the proposed corrections, should appear here.

Other than that, the Grammarly menu gives you instant access to additional features. This includes premium-only benefits like vocabulary enhancement and the plagiarism checker tool.
If your daily tasks involve either MS Word or Outlook, the Grammarly integration is a huge time-saver.
Sadly, the MS Office integration is only supported by Windows devices. For Mac users such as myself, we can rely on the downloadable desktop app for our proofreading work.
Grammarly Keyboard
Great — you now know how to use Grammarly on your browser, desktop, and MS Office applications.
What if a chunk of your work takes place on the go? How nice would it be to have the proofreading functionalities of Grammarly right in your pocket?
That’s what the Grammarly Keyboard for iOS and Android devices is for.
As shown in the Grammarly website, this can be downloaded and installed from the appropriate app store. You may also request for an installation link via SMS by entering your phone number.

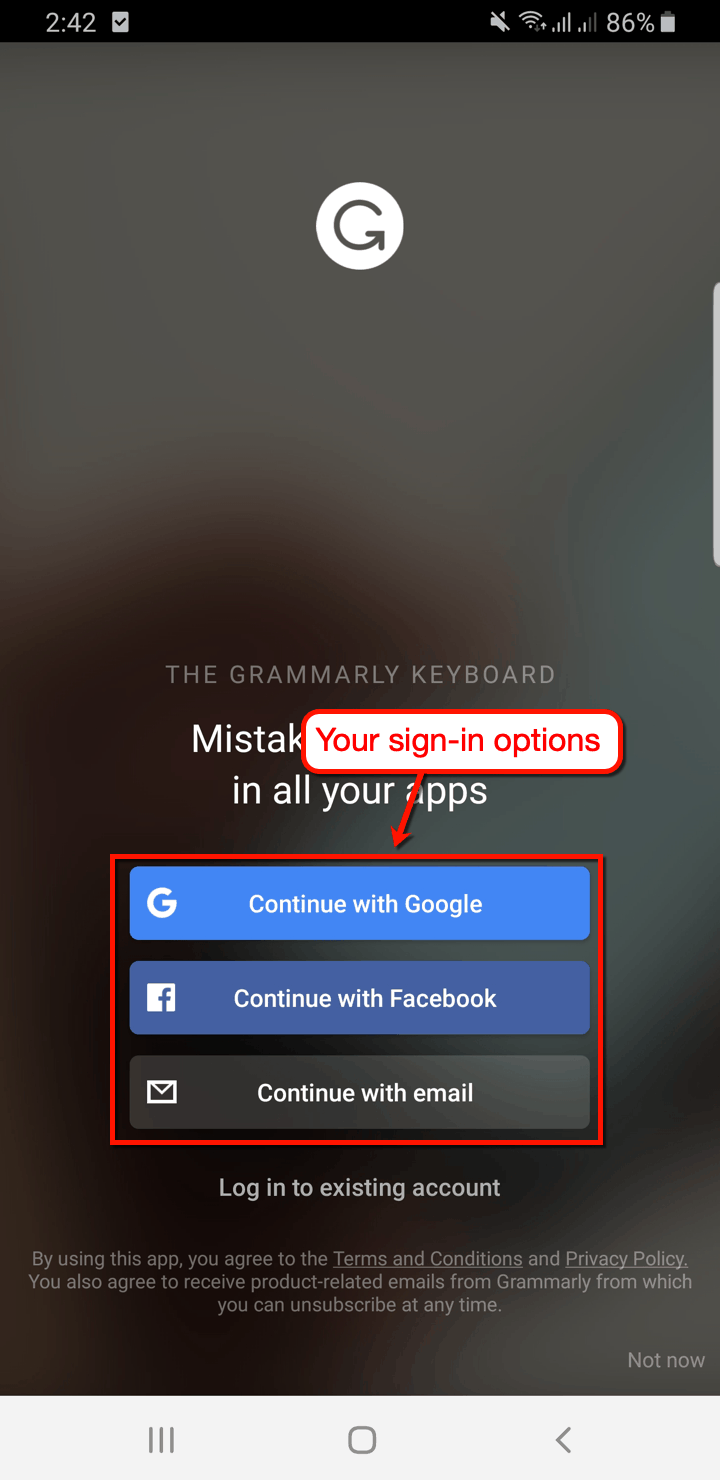
To activate Grammarly Keyboard on your phone, start by logging into your account.
Just like the rest of the Grammarly apps, your sign-in options include your email address, Facebook, and Google account.
Take note that the screenshots I’ll use were taken in an Android device. If you use an iOS smartphone or tablet, the rest of the setup process may be slightly different.
The next step is to tap ‘Add Grammarly Keyboard’ on the “Set Up Grammarly” page. This will take you to the list of virtual keyboards available on your device.
Go ahead and switch on the “Grammarly” keyboard.

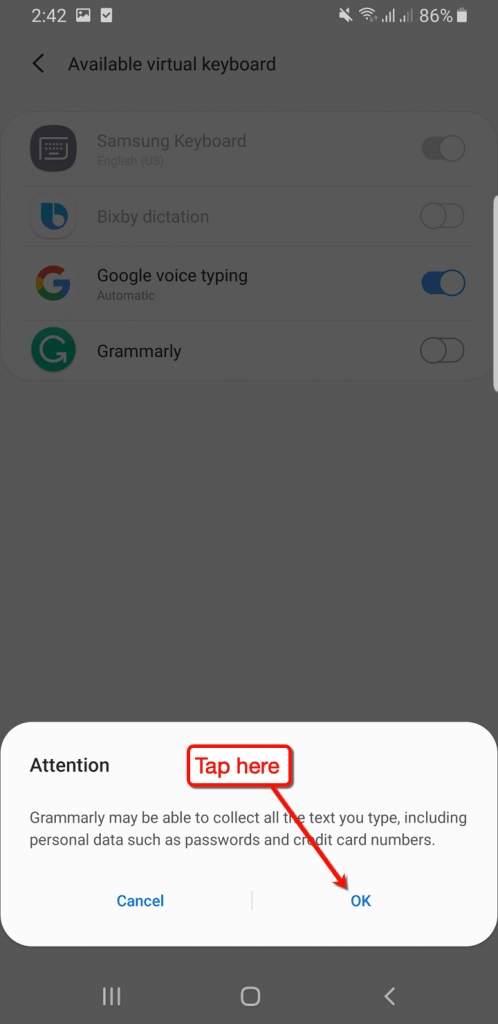
The Android OS may show you a warning of the potential implications of using third-party keyboards.
Don’t worry — this is just standard procedure. I can vouch for the Grammarly brand so you can tap ‘OK’ with confidence.
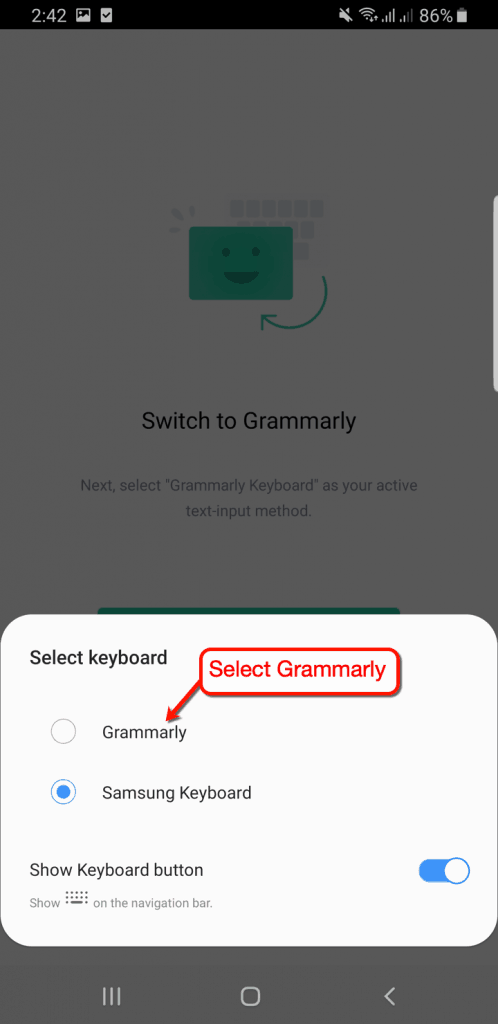
Activating the Grammarly Keyboard allows you to use it as your primary input method. You can do this by selecting ‘Grammarly’ when asked to select a keyboard.
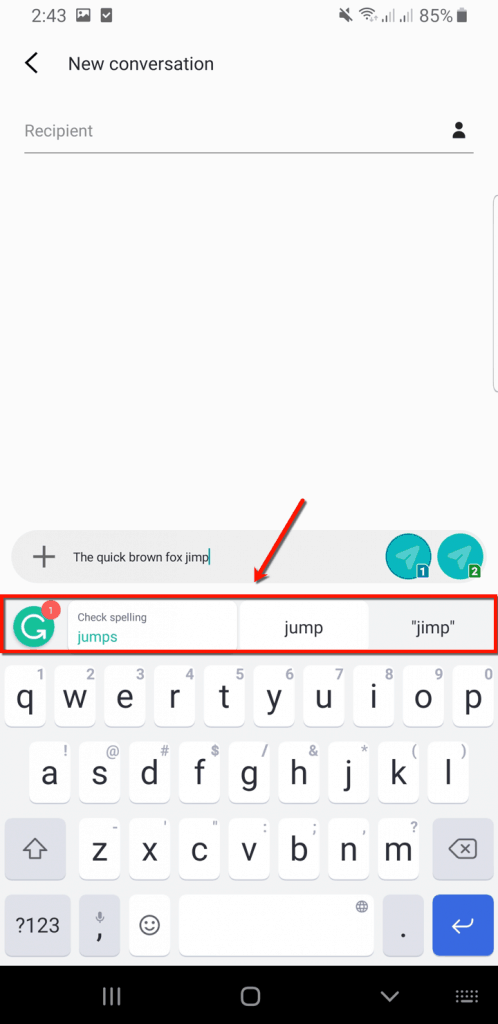
Once installed, you can now type anywhere on your phone while Grammarly proactively checks your inputs for mistakes.
If you’re familiar with other third-party keyboards with built-in spell checkers, you should already know how Grammarly Keyboard works.
As you type, word suggestions and corrections will be displayed above the main keyboard area.
The Grammarly Keyboard is great for users who like to get some work done on a mobile device. Typical use cases include sending emails, posting on social media, and writing on a mobile word processor.
You may also fine-tune how you want the Grammarly Keyboard to behave by accessing ‘Grammarly Settings’ from the app interface. From there, you can manage features like auto-correction, emoji suggestions, predictive text, and so on.

Picked your favorite way to use Grammarly?
I personally enjoy using the web interface since I do most of my work on WordPress. This lets me switch between a draft I’m working on and the Grammarly Editor as separate tabs.
Since I’m used to the Grammarly web interface, let me show off some of the features I liked.
2. Exploring the Grammarly Editor
First and foremost, I applaud the design team for keeping the Grammarly app fast and minimal.
There are no excessive menus, visual elements, or widgets to distract you from your proofreading efforts.
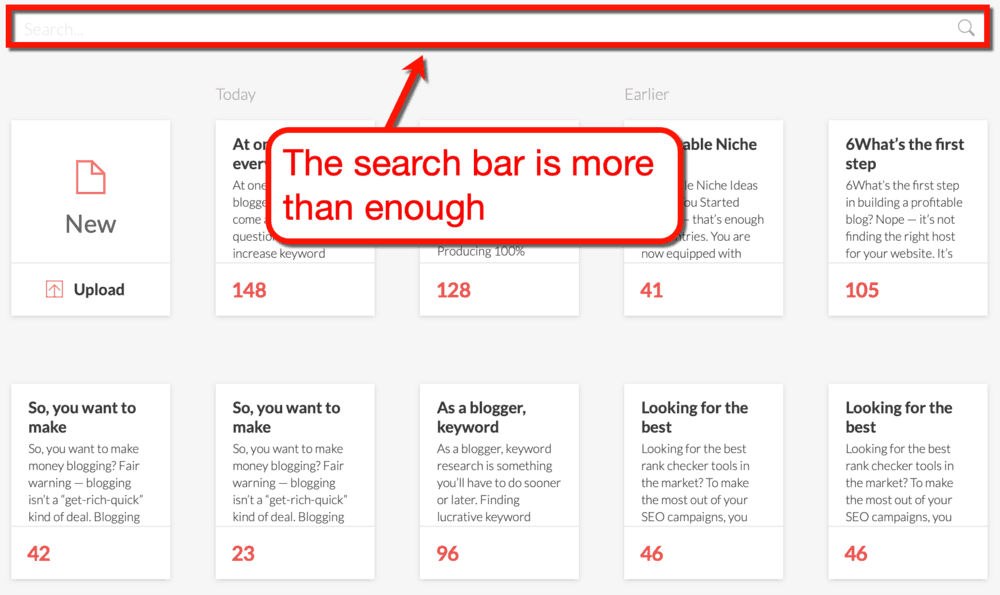
If you need to find an article in your library quickly, simply use the search bar at the top. There’s no need for an intricate folder system that will only add to your workflow.
Diving into the Grammarly Editor, everything is as simple as it gets.
You see, proofreading doesn’t have to be complicated. That’s the reason why the Grammarly design team decided to go with a clutter-free user interface.
Even the toolbars to the left and the bottom of the editor are barely noticeable.
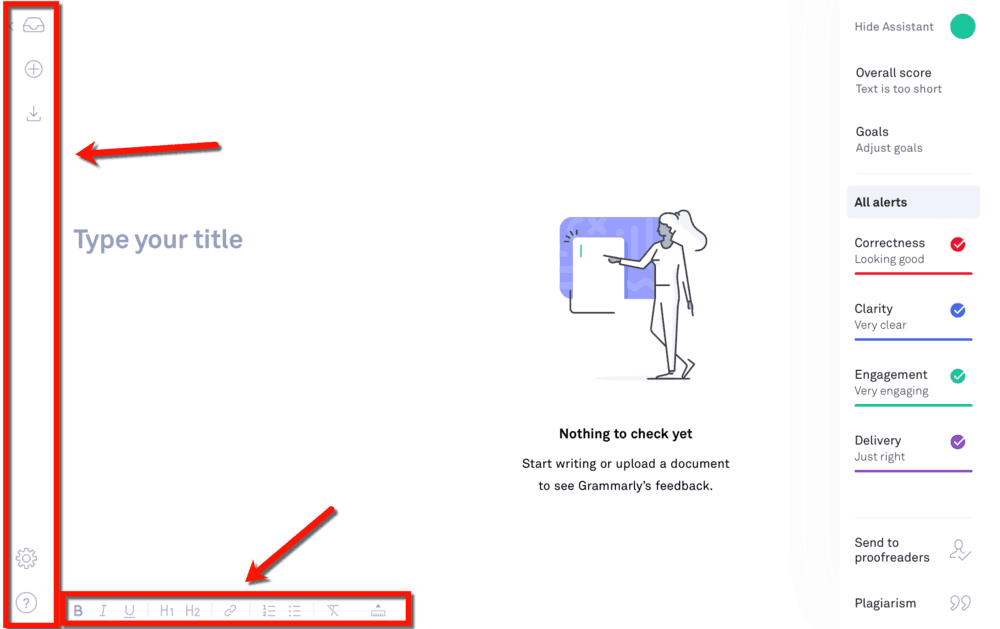
The Grammarly Editor toolbars
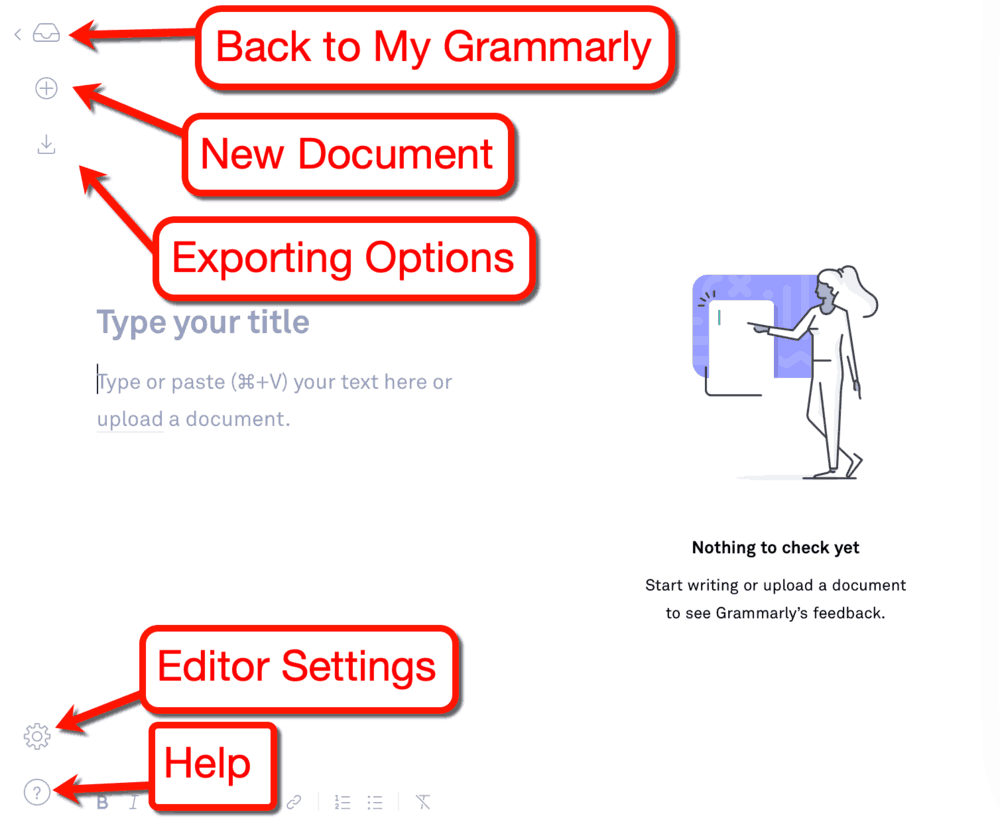
The left toolbar options are as follows:
- Back to My Grammarly — Click here to return to the “My Grammarly” page.
- New Document — If you want to create or upload a document, click here.
- Exporting Options — This next sub-menu lets you print, download, or copy your text.
- Editor Settings — The editor settings window lets you enable the “auto-jump” and “increase font size” features. Both are optional, but they can be helpful to some users.
- Help — Lastly, the classic help button points Grammarly’s support section. It also allows you to revert back to the classic editor, view the privacy policy, and send feedback.
Take note that these aren’t the official names of these menu items. I merely used my own words to help beginners understand what each button does.
The bottom toolbar, on the other hand, consolidates the standard formatting options you can find in most word processors. This includes the following:
- Word emphasis (bold, italic, and underline)
- Header tags
- Hyperlink
- Numbered and bulleted lists
- Document metrics (word count, character count, reading time, etc.)
Getting to know the Grammarly Assistant
Now that we’re done inspecting Grammarly Editor’s toolbars, it’s time to test how well it performs.
Let’s see what Grammarly has to say regarding the first few sections of this post.
All I need to do is copy the text I want to check and wait for Grammarly to provide its feedback. Within seconds, the tool says there are 15 issues I should check.
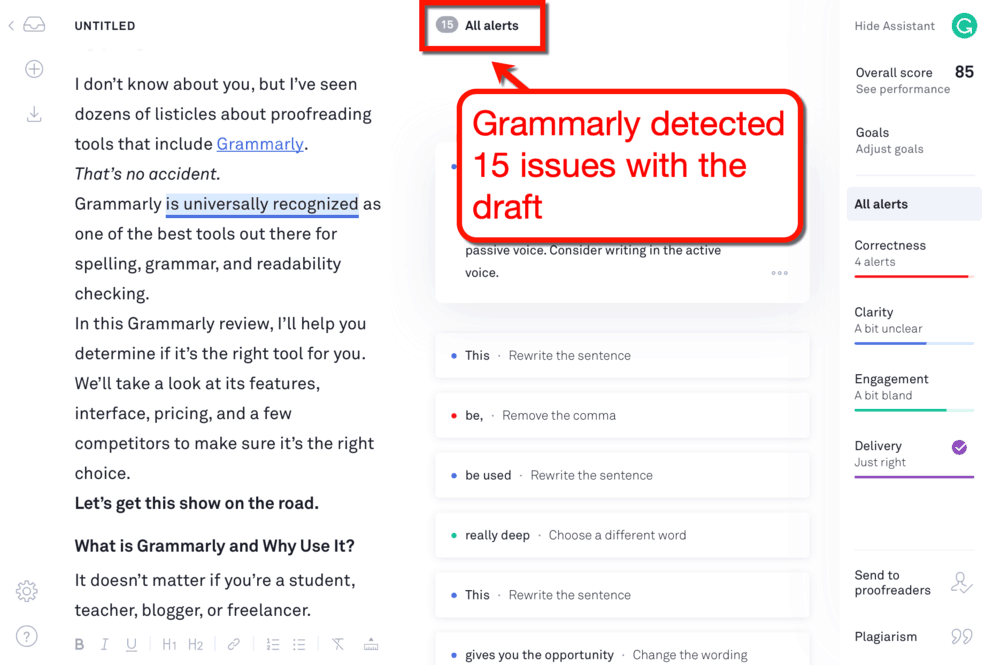
This is the “Assistant” panel of the Grammarly Editor.
Directly below the total number of alerts is the comprehensive list of recommendations.
If you’re editing with Grammarly, this is where you’ll spend most of your time. Just work your way from top to bottom and apply the suggested corrections.

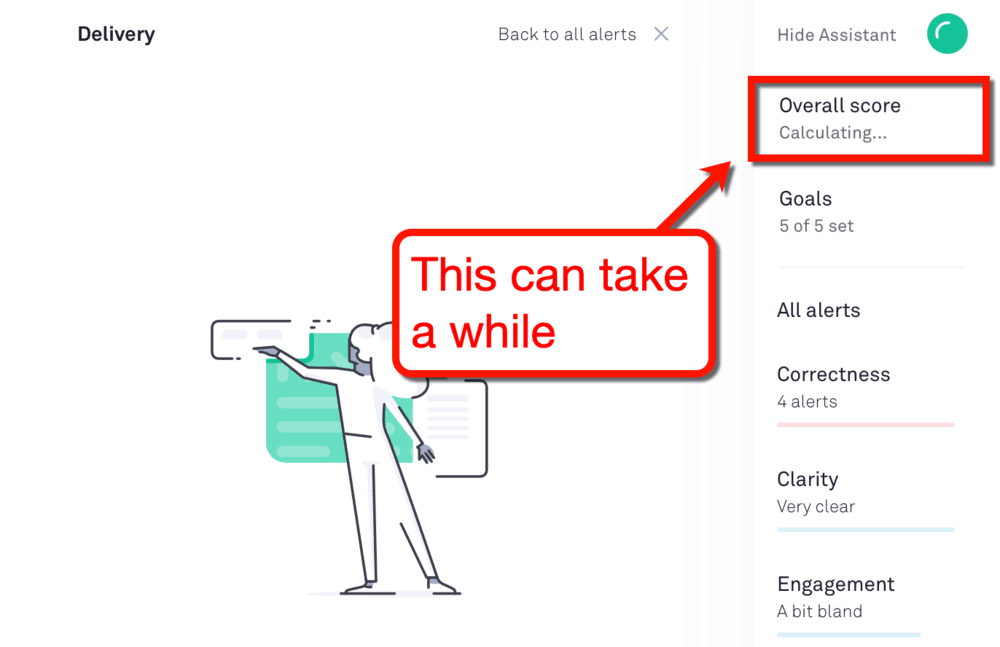
To the right of the assistant panel is the analysis of your document, which starts with your article’s overall score. Click on it for an in-depth view of your article’s performance.

The article’s performance report reveals valuable insights like its readability score, percentage of unique words, and average reading time. Take note that these metrics are generated relative to the tests run by other Grammarly users.
It’s also ideal to focus first on your overall performance score, which is found at the top of the report.

Understanding your article’s performance score
The higher your article’s performance score, the easier it is to read.
Grammarly recommends aiming for a performance score of at least 60. This should indicate that your article is easy to read for people with an eighth-grade education or higher.
Since my draft got a performance score of 85, it doesn’t need a ton of tweaks to maximize readability. Regardless, I can improve this score by applying the recommendations that Grammarly compiled for me.
As I write this sentence, I’m itching to work on the issues Grammarly brought up.
But before I get too excited, I need to do something first.
3. Setting Grammarly goals
The thing with proofreading tools is, they seldom take into account the user’s personal writing style and their audience’s preferences.
A lot of them seem to enforce a specific, rigid writing style that can suck out a writer’s personality.
With Grammarly, that isn’t a problem.
It lets you set your own goals by specifying your target audience, article type, tone, formality, and intent. Doing so will adjust Grammarly’s performance scoring algorithm accordingly.
To load up the “Set goals” window, click on ‘Goals’ on the Grammarly assistant menu.

Setting goals with Grammarly is pretty straightforward. It lists down all the factors that affect the scoring system and lets you set your preferences for each.

Let’s go over your options when optimizing each factor for your Grammarly goals.
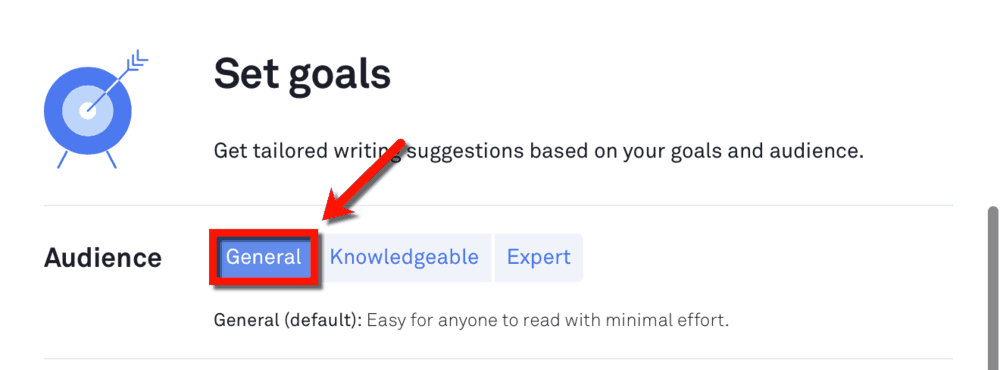
Who is the article for?
When creating a written piece, it’s important to pay attention to your intended audience.
Are you writing for the general, online public? Do readers need a certain degree of education to comprehend your article?
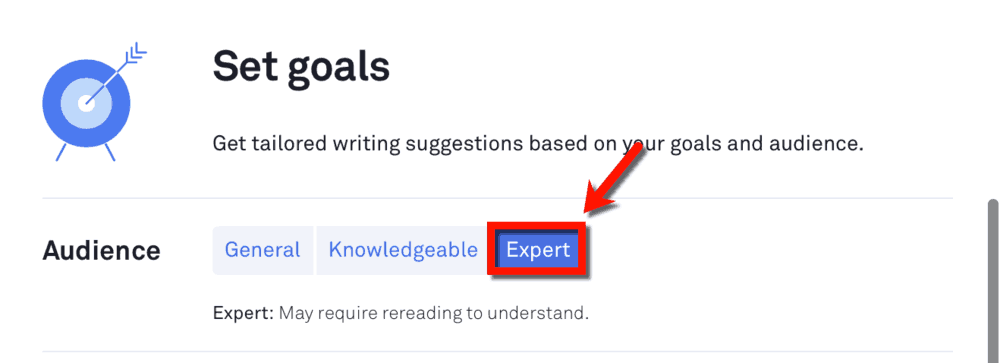
If you want to make your content understandable to laymen, keep the “Audience” setting to ‘General.’
However, if your content requires readers to be knowledgeable about certain concepts and some technical terms, then choose ‘Knowledgeable.’

Finally, if you tackle advanced topics that may require your audience to read your article twice or more, pick ‘Expert.’ This will rewire Grammarly’s scoring system to be more forgiving when it comes to the complexity of your sentences.
As for me, I just leave these options as they are. That’s because I write content for anyone who wishes to learn blogging — something that doesn’t require an educational degree.
How formal is your language?
For bloggers like me, we sometimes feel the urge to use slang and casual language to keep things interesting.
I try not to do it on purpose, but if the opportunity presents itself, I’ll gladly take it.
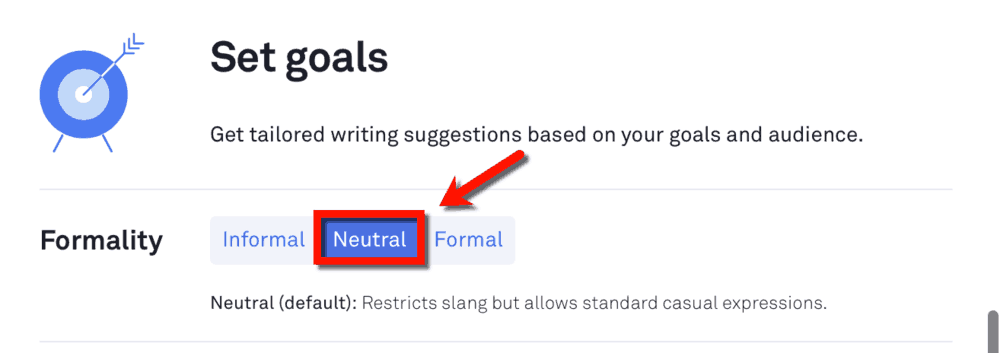
That’s why I keep my Grammarly goal for “Formality” at ‘Informal.’

However, if you’re writing landing page copy, product pages, or anything similar, you need a stricter setting.
‘Neutral’ should do nicely if you also want to include casual expressions. Some examples are “stay in touch,” “fingers crossed,” and “cheers.”
If you’re working on an academic paper, business report, or the likes, you may need to use the ‘Formal’ setting. This restricts most, if not all, forms of slang and informal language.
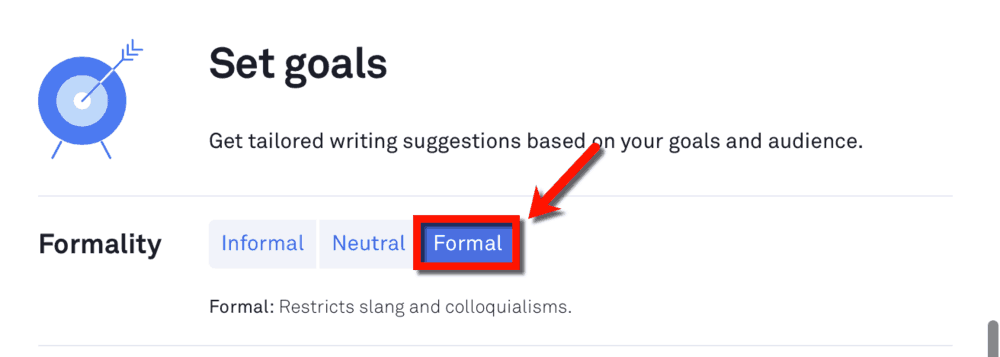
Interestingly, contractions like “you’re” instead of “you are” and “we’re” instead of “we are” are allowed with the formal setting. Watch out if you are given strict editorial or general writing guidelines.
If you want an even stricter scoring system, don’t forget to set the proper “Domain” or document type.
What document are you writing?
There is a writing style for every document type.
And for every document type, there are different sets of rules you must abide by.
Unlike plenty of proofreading tools that enforce the same rules for all projects, Grammarly is a lot more flexible. It lets you define the type of document you’re working on so it can determine the rules you should use.
Again, us bloggers should just use the default option.
With the ‘General’setting in place, most of the beneficial writing rules and conventions are still used. However, Grammarly will let minor things like casual expressions and colloquialism slide.

If you choose the ‘Academic’ domain option, Grammarly will firmly impose all formal writing conventions and rules. Academic users, like students and teachers, should get used to Grammarly’s scoring system with this in their goals.

What are the writing rules and conventions for academic writing, you ask?
Sad to say, explaining the writing rules and conventions for all document types warrants its own article. The least I could do is point you in the right direction by linking to appropriate learning resources.
The academic writing rules and conventions, for instance, are summed up in this PDF by Duke University.
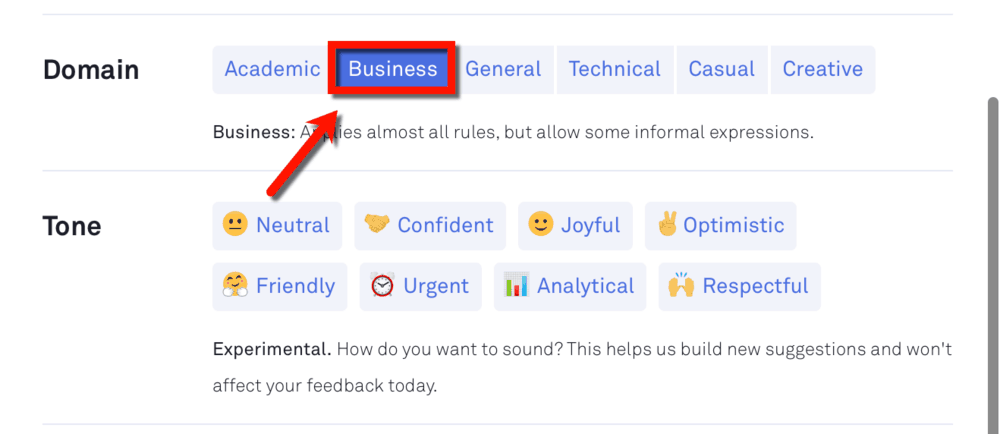
‘Business’ will also apply most writing conventions and rules. But unlike ‘Academic,’ you’re free to use casual expressions to get your point across.
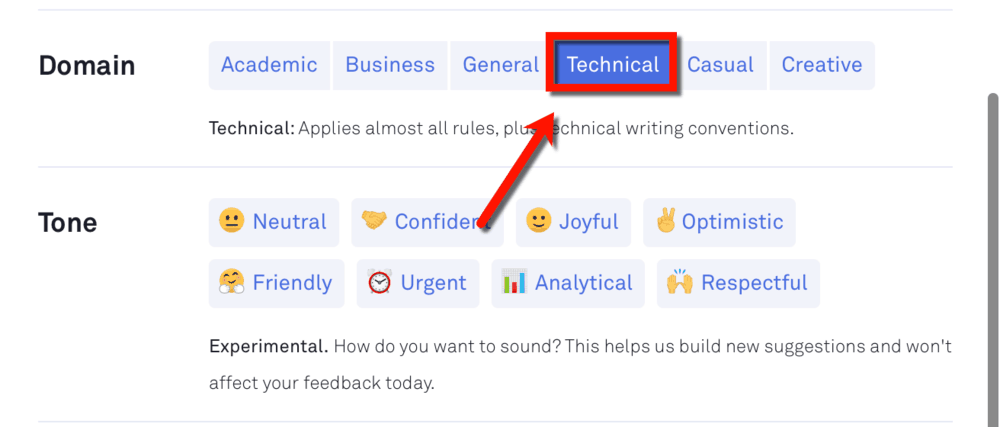
Moving on to the ‘Technical’ option, Grammarly will still apply almost every writing rule in the book. It will also use the technical writing conventions, as explained in this PDF by Michigan State University.
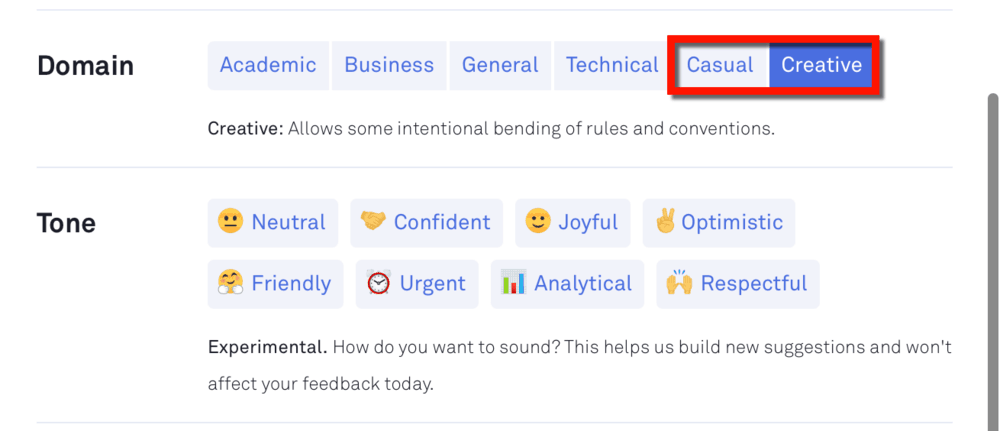
Next comes the ‘Casual’ and ‘Creative’ document types.
Both can be used if you want freedom in conveying your message. ‘Creative,’ however, will ignore a lot of rules so you can write to your heart’s content.
As far as correctness is concerned, the “Tone” and “Intent” options in your Grammarly goals don’t really matter much. Instead, they help the tool provide word suggestions that resonate with your article’s objectives.
The catch is, both goal options are still in an experimental stage.
As of writing this review, the “Tone” and “Intent” goal options won’t affect Grammarly’s feedback and scoring of your article. Instead, it will help the developers implement an emotion- and intent-based word suggestions system in the future.
Nice — you’ve now got your goals set.
It should take a minute or two before Grammarly updates your article’s performance score.
In addition to your new overall score, the Grammarly Assistant may also come up with new suggestions.
That takes us to the next step.
4. Dealing with Grammarly alerts
Fixing the issues Grammarly detected should be easy-peasy.
As I’ve mentioned before, all alerts will be organized neatly on the Grammarly Assistant panel. A lot of corrections can also be applied just by clicking one of Grammarly’s suggestions.
For example, here’s one where Grammarly says I placed an unnecessary comma.
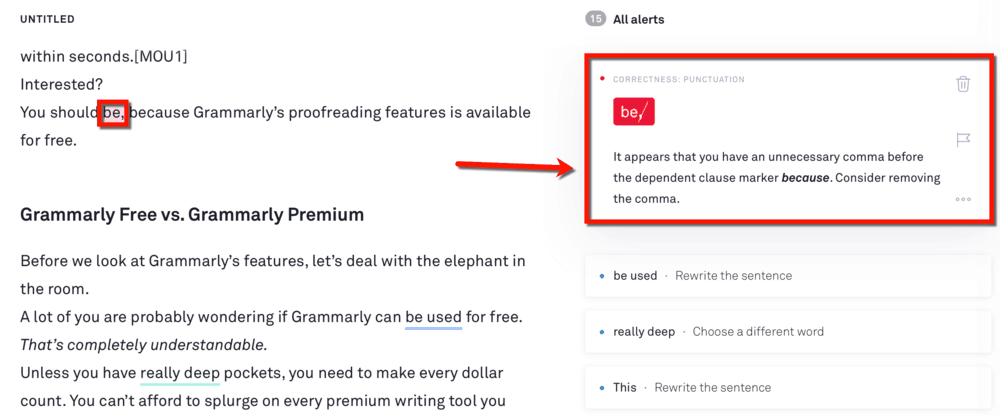
What do I do?
Easy — I just click on the red “be” button on the alert to instantly fix my error.
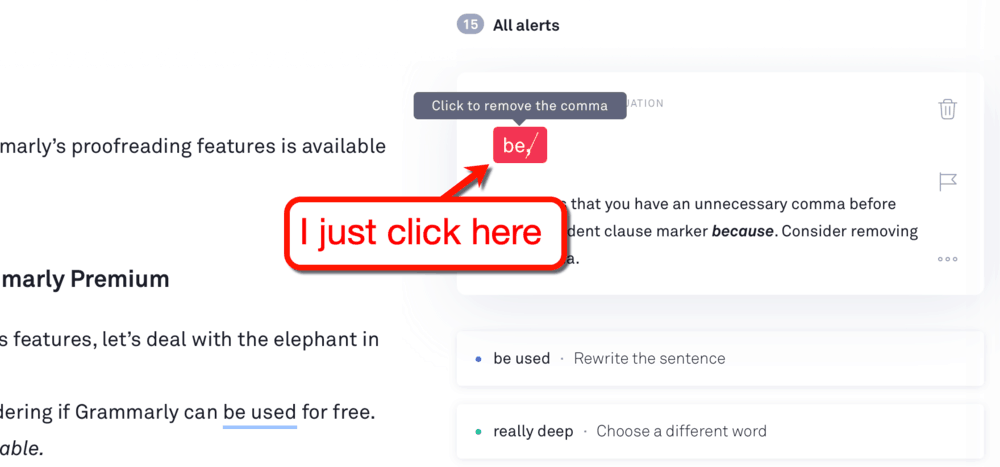
The screenshot above shows an issue with correctness — one of the four alert categories that Grammarly checks.
To appreciate the effectiveness of Grammarly’s corrections, we should talk about these alert categories for a second.
What are correctness alerts?
Correctness alerts pertain to general grammatical, spelling, and punctuation mistakes. They should be relatively easy to fix since Grammarly offers corrections for all of them.
The majority of proofreading tools on the web can indeed spot correctness issues. But you have to admit that Grammarly’s streamlined detection-to-resolution approach makes everything feel a lot better.
In some cases, Grammarly will show you more than one suggestion for a correctness alert. You then have to click any of them from the Grammarly Assistant panel to resolve the issue.

To view all correctness alerts detected in your article, click ‘Correctness’ on the Grammarly Assistant menu.

Fixing all the correctness issues will ensure that your article is grammatically-sound — but it still wouldn’t be perfect.
You still have to deal with clarity, engagement, and delivery issues in your article.
What are clarity alerts?
Remember that accurate grammar, spelling, and punctuation usage aren’t enough to create a stellar article.
Your entire piece must also flow well and discuss key points in a crystal-clear and concise manner.
Long story short, you need to type less to say more.
You can achieve this with Grammarly by looking at clarity alerts. These are highlighted in blue on the Grammarly Editor.

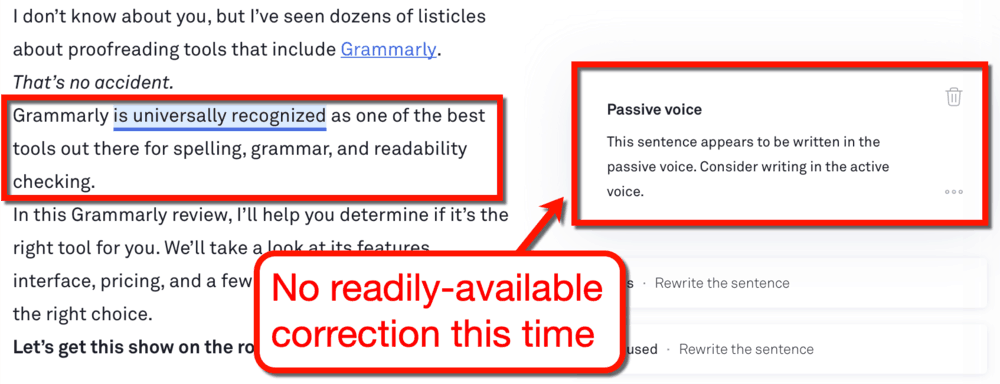
One clarity issue is the use of passive voice.
If a sentence has a passive voice, it emphasizes the action or its receiver instead of the subject.
For your reference, here are some examples of sentences written in passive voice:
- The company has been founded by Mr. A.
- A song was written by her.
- Employees were fired by the manager.
True — these sentences are grammatically correct. But if you read them aloud, they don’t sound pleasant at all.
Luckily, Grammarly can provide corrections for simple sentences written in passive voice. Check out its recommendations for the example sentences above:

As reliable as Grammarly is, there are times when it can’t provide one-click fixes.
A good example would be one of my opening sentences in my draft. Due to its length, Grammarly was unable to supply a ready-made correction.
To avoid the excessive use of passive voice, here are a few writing tips you ought to remember:
- Avoid using the word “by” when describing an action.
- Keep an eye out for the phrases “have been” or “has been” — they are telltale signs of passive writing.
- If you’re having difficulty writing in active voice, identify who or what does the action.
What are engagement alerts?
Both the correctness and clarity suggestions are available to free Grammarly users. The next two alert categories, however, are only for those who spent cash on a premium subscription.
Keep in mind that, in writing, there are intangible differences between the brilliant and the mediocre.
Sure, there are objective aspects like correctness and conciseness that can be measured. What average writers don’t have, however, is the ability to weave words together in an engaging fashion.
With Grammarly Premium, you can get suggestions that can help make your article more captivating. These are packaged in the ‘Engagement’ alert category, which you can access from the Grammarly Assistant panel.

Engagement alerts mostly encourage you to pick a substitute for common and overused words. In some cases, Grammarly will suggest stronger adjectives to make the text more impactful.
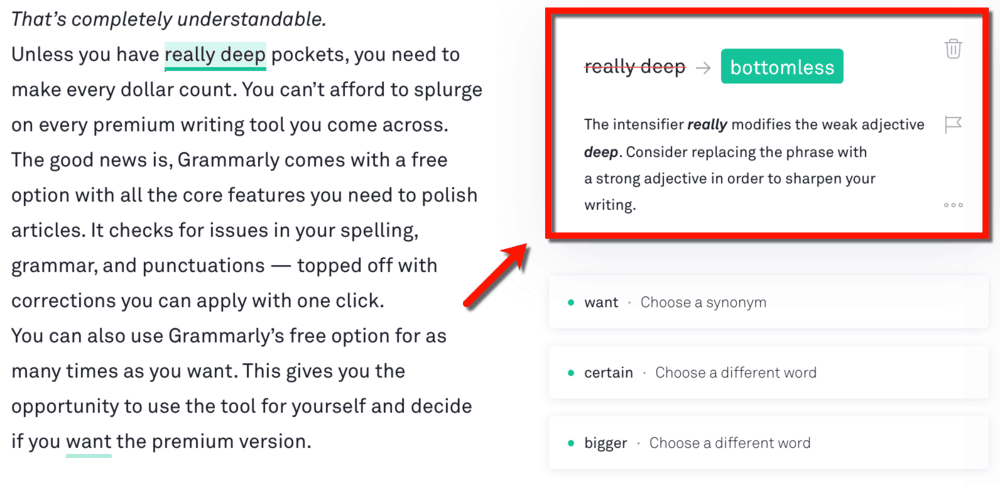
As you can see, engagement-related suggestions aren’t mandatory and can be skipped altogether. Most of them will be synonym suggestions, anyway.
Nevertheless, I would recommend at least looking at them so you can expand your vocabulary over time. I’m sure there’s potential in everyone’s personal writing style, but it won’t hurt to have a little variety.
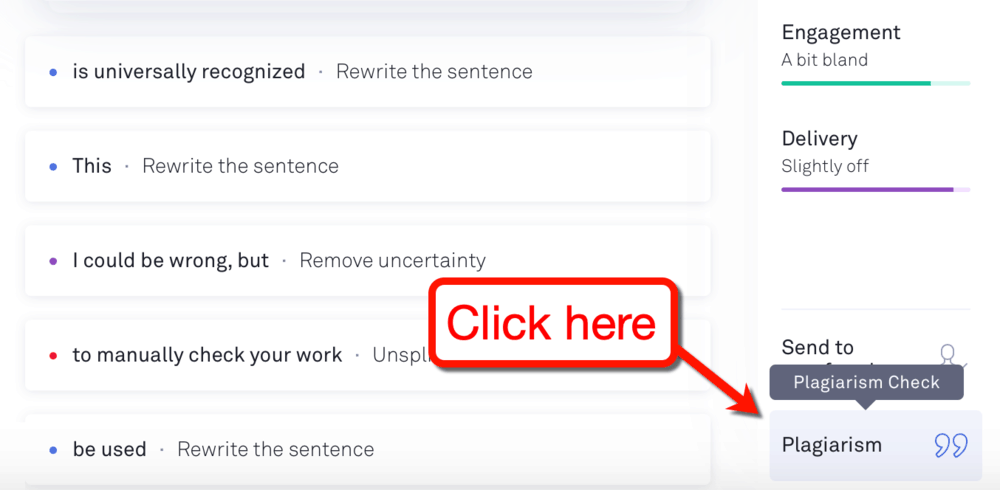
What are delivery alerts?
Apart from the engagement factor of articles, you should also pay attention to the delivery of your message.
You don’t want to give readers the wrong idea with poor word choices.
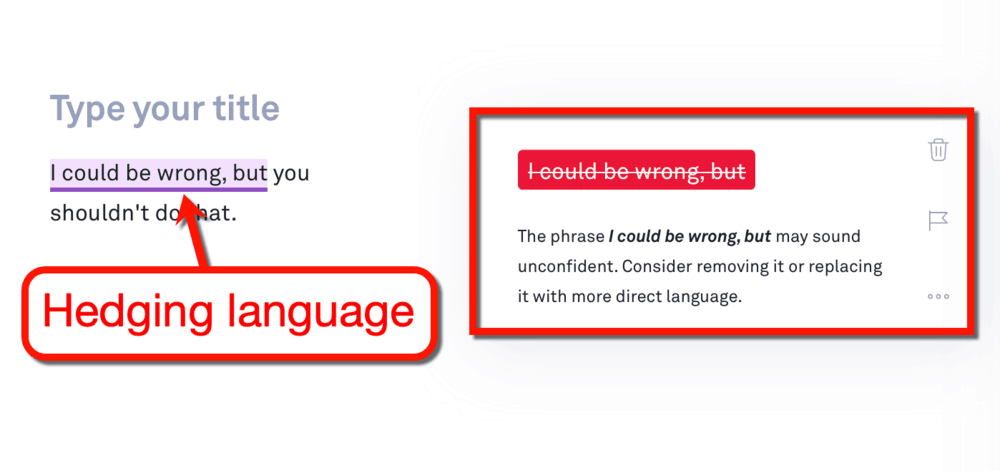
Furthermore, you could be using hedging language, which makes you sound unsure of what you’re saying. This is particularly troublesome if you’re working on outreach emails for lead generation or an academic paper.
Some examples of hedging language include phrases like “I could be wrong” and “may or may not.”
If you wish to compel readers, the last thing you need is uncertainty. But that doesn’t mean you should just speak your mind haphazardly, either.
Learn when to tone your language down to avoid offending readers. Better yet, let Grammarly analyze your article’s delivery, especially if you’re covering controversial topics or expressing disagreement.
Grammarly can help you by monitoring the level of politeness in your sentences. If you stepped over the line, you’d get an alert like this one:

That should wrap up how proofreading tasks are done with Grammarly.
Despite the thoroughness of Grammarly’s scoring algorithm, most users can breeze through the list of alerts and suggestions. It’s an impressive accomplishment considering the fact that it runs more tests than the average proofreading tool.
5. Checking your article for plagiarism
Handling the alerts on the Grammarly Assistant panel should polish your piece to perfection.
There’s just one more thing you need to do before you finalize your draft.
If you’re a student, freelancer, or blogger, you need to guarantee the originality of your work. I’m not saying this because you may have copied and pasted some of the text, but because of unintentional plagiarism.
I explained this in my recent article about the top online plagiarism checkers. Put simply, your article may still get flagged by plagiarism checkers because of comparable sentence structures and word groups.
To avoid unintentional plagiarism, one round of Grammarly’s plagiarism checker will do the trick.
Using the Grammarly plagiarism checker
For most cloud-based writing tools, cramming too many features into one interface may spell trouble. This could make the user interface look too busy and clunky.
Fortunately, Grammarly managed to integrate all features into a single, seamless interface.
Similar to alert categories, you can fire up the plagiarism checker from the Grammarly Assistant panel.
The plagiarism checker may take anywhere from a few seconds to a whole minute to finish. Once the analysis is complete, potential plagiarism alerts will be listed along with matching sources.

It’s worth noting that Grammarly will not spoon-feed correction suggestions for potential plagiarism to you.
This time around, use your own discretion to assess the matching texts. If they’re significant enough, consider rewriting them or adding a proper citation.
To test the accuracy of Grammarly’s plagiarism checker, I straight-up copied a section from a popular post.
As expected, Grammarly was able to detect the plagiarized text as well as pinpoint the original source.
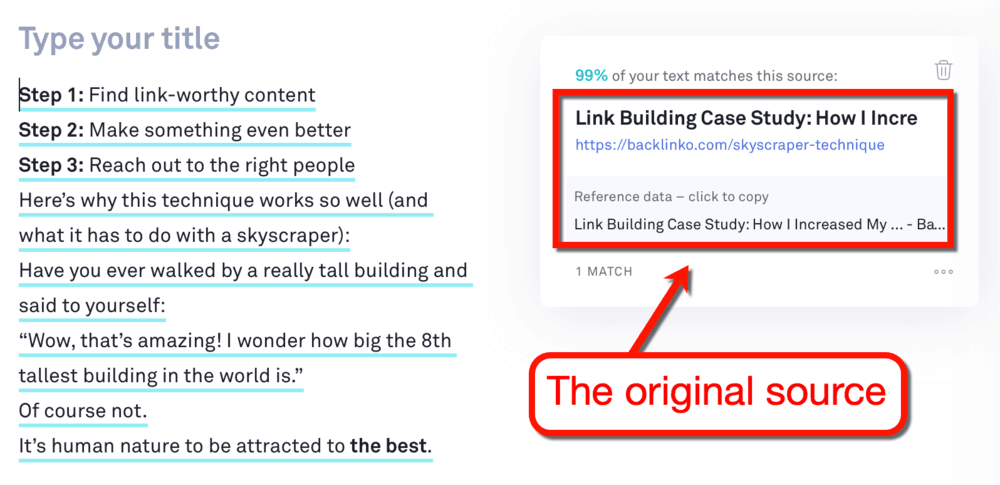
Although Grammarly utilizes ProQuest databases and more than 16 billion pages, it sometimes doesn’t detect plagiarism from other publication formats.
Its plagiarism checker is capable enough for bloggers and freelance copywriters. Students who are 100% confident that they wrote their papers from scratch should also be safe.
If, however, you’re a teacher or a representative of an educational institution, I’d look at other plagiarism checkers like Scribbr.
6. Sending your article to human proofreaders
Finishing a proofreading task with Grammarly is nothing short of fulfilling.
I, myself, like to get an overall performance score of over 90 before I’m satisfied. And for the most part, I don’t struggle too much to achieve my goal.
But in case you get overwhelmed by the number of alerts Grammarly brought up, there is another option.
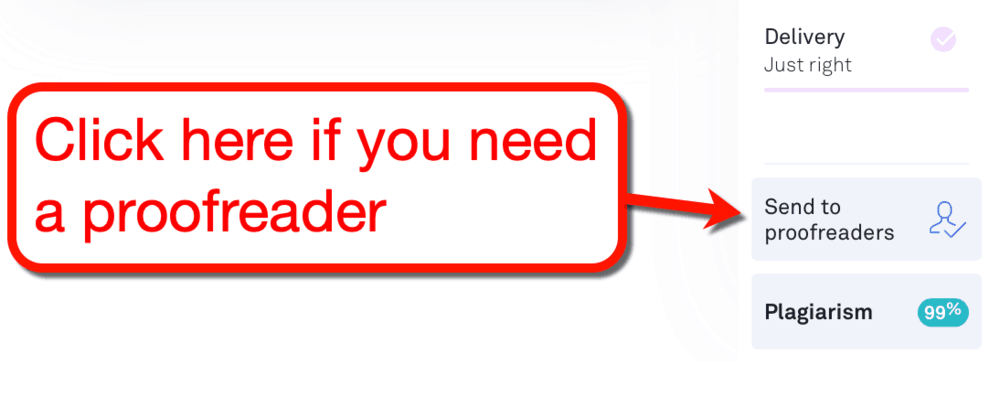
You can hire human proofreaders to do the heavy lifting for you.
That’s what the ‘Send to proofreaders’ button is for.
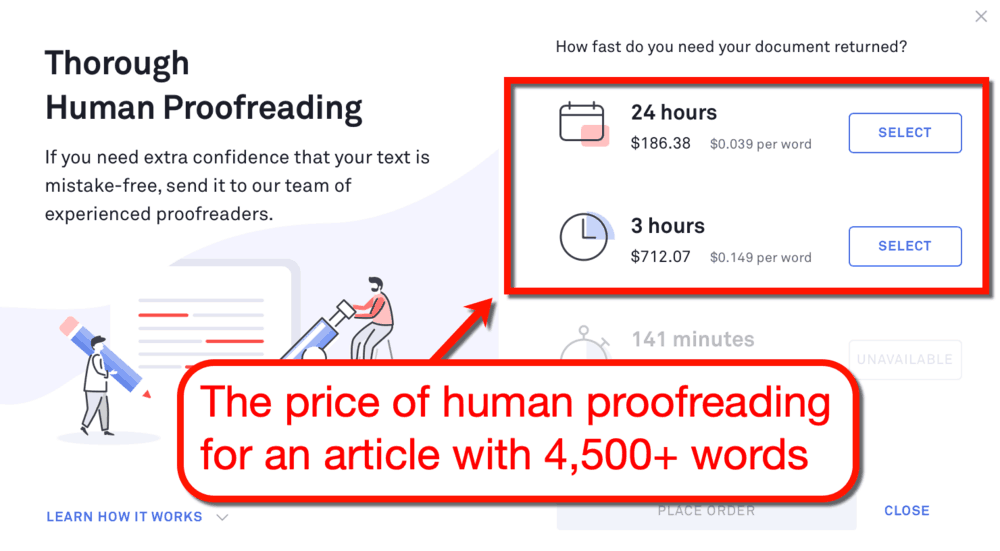
The rates for a human proofreader are:
- $0.039 per word for a 24-hour turnaround time
- $0.149 per word for a 3-hour turnaround time (faster if you have a short article)
Just bear in mind that you could end up paying hundreds of dollars if you’re working on a lengthy article.
Before you place an order, take a second look at the alerts and resolve as many as you can yourself. When done, remove them from the Grammarly Editor and click the ‘Send to proofreader’ button again to refresh the rates.
A few minutes with the Grammarly Editor could potentially shave off hundreds of dollars from the cost of human proofreading. Don’t be lazy and click on those correction suggestions!
Verdict
Alright — I think we’ve covered all there is to discuss about Grammarly.
If you’re still undecided, here are my ratings for Grammarly when it comes to key factors:

Thanks to Grammarly’s design, new users can get productive with the tool right away. The learning curve is virtually non-existent, and the platform itself is fast and intuitive.
Usability: 5 Stars

In the world of proofreading tools, Grammarly is at the top of its class. It’s hard to think of an alternative that can match its effectiveness in detecting correctness and readability issues.
Grammarly is also one of the very few proofreading tools that can tailor its entire scoring algorithm to your goals.
Proofreading: 5 Stars

Is the Grammarly Plagiarism Checker reliable? Yes.
Is it the best plagiarism checker tool money can buy? No.
If you already have Grammarly Premium, then the plagiarism checker is definitely a big bonus. However, Grammarly shouldn’t be your first option if you absolutely need a plagiarism checker.
Plagiarism Check: 4 Stars

You don’t see a lot of proofreading tools with their own mobile keyboard app.
Grammarly can also be integrated into major web browsers and MS Office. If that level of accessibility isn’t worth five stars, then nothing is.
Accessibility: 5 Stars

You are getting a proofreading tool, word processor, and plagiarism checker rolled into one — it’s well worth $29.95 a month.
If you need Grammarly for the long-term, you can cut the monthly cost in half with annual billing.
Pricing: 5 Stars

My final recommendation?
Get Grammarly Premium if you have the budget.
It’s everything you want a proofreading tool to be.
You don’t have to take my word for it. Go — use the free Grammarly browser extension and see for yourself.
As you do research, you may also want to look at the following Grammarly alternatives:
- ProWritingAid
- WhiteSmoke
- Ginger Software
- Paper Rater
- Scribbr
Conclusion
The bottom line is, you can’t go wrong with Grammarly whether you’re a student, blogger, freelance writer, or website owner. It is the most flexible and trustworthy proofreading tools on the planet — period.
If, however, you work for an educational institution and need a plagiarism checker, Grammarly shouldn’t be your first choice. Other than that, it’s undoubtedly one of the best proofreading tools available today.
Experience Grammarly Today with a 40% Discount!
For questions, feedback, and suggestions, feel free to leave a comment below. I’m looking forward to your input!


Comments
Post a Comment